Changing data in AIMMS
In this tutorial you will extend the table widget that has been built in the previous tutorial with edit support. This will allow the end user to change model data by changing values in the widget.
Before we begin - Prerequisites
To make the most out of this tutorial, it is important that you meet a couple of prerequisites.
First of all, we are going to assume that you already familiarized yourself a bit with the AIMMS WebUI. Both with the end-usage and the app-development. That you have a recent AIMMS and that you have it running in your set-up.
Since this is a (software) development tutorial, we are also assuming that you have experience in writing software in a generic programming language and that you have a basic knowledge of HTML5 technologies (HTML5 DOM, CSS, Javascript, and the likes). It is also beneficial, however not required, if you are familiar with jQuery and to a lesser extent jQuery UI as AIMMS WebUI is built on top of these technologies.
More specifically, since we will be creating an HTML table widget, we assume that you are familiar with the basics to create an HTML table.
Finally, since this tutorial uses the concepts that have been introduced in the previous tutorials and in particular ‘tutorial-4’, we expect that you have completed the previous tutorials ((Writing your first custom widget, Adding dynamic contents, part I: Options, Adding dynamic contents, part II: Simple data from AIMMS, and Creating a custom widget with multi-dimensional data from AIMMS) first.
Sending data changes to AIMMS
Whenever the option type of the contents has the JavaScript type property “datasource”, its resolved value will be an AWF datasource object. As mentioned in the previous tutorial, data that represents the actual values of the identifier is accessed through the values part of the datasource. To change identifier data the AWF datasource.values object has a requestSetValues method that should be used to send data changes to the model. For example, to change the value in cell (0,1) of a table to 1234, the following JavaScript statement can be used:
dataSource.values.requestSetValues([{
    ranges: [{start:0,end:1},{start:1,end:2}],
    layerName: "values",
    value: 1234
}], function onDone(status) {
    // handle model feedback
});
The requestSetValues method can only be used on a datasource that is up-to-date. An because a datasource is invalidated by a data change itself, the datasource reference needs to be refreshed by obtaining the value from the contents option. Typically, this can be taken care of automatically as, after a data change, the widget will receive a resolved option change for the contents option with the up-to-date datasource as its value. This is the approach we will take in this tutorial.
Creating the input elements
To make sure that the user of the widget can provide input, we will update the table that has been created in the
previous tutorial. For this purpose, every <td> HTML element will be populated with an extra
<input> element.
First, we will add a function createInputElQ (in the function _createHtmlTable from the previous tutorial, just beneath the function createCellElQ):
function createInputElQ(name, row, col) {
    return $(['<td><input type="text" class="', name, ' row'+row, ' col'+col, '"></input></td>'].join(''));
}
In addition, we change the code that build the row header and grid area to
var numColsInGrid = numColsInColHeader;
var tbodyElQ = $('<tbody>');
_times(numRowsInRowHeader, function(row) {
    var trElQ = $('<tr>');
    _.times(numColsInRowHeader, function(col) {
        trElQ.append(createCellElQ('th', 'rowHeader', row, col));
    });
    _.times(numColsInGrid, function(col) {
    var gridElQ =
        trElQ.append(createInputElQ('values', row, col));
    });
    tbodyElQ.append(trElQ);
});
In addition, we need to update the updateTableCell function (inside the _fillTable function) because,
for an <input> element, we now need to set the value attribute to initialize the cell with a value.
The function should be updated as follows:
function updateTableCell(type, row, col, text) {
    var cellElQ = widget.tableElQ.find('.'+type+'.row'+row+'.col'+col);
    if ( type == "values" ) {
        cellElQ.attr('value',text);
    } else {
        cellElQ.text(text);
    }
}
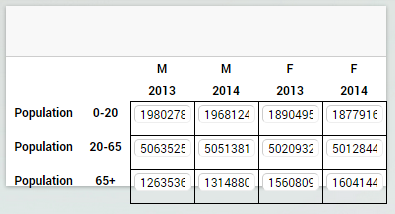
As shown in Figure 1 the <input> elements do show the value but do not yet nicely fit into the
<td> elements. To resolve this we will remove all CSS styling from the <input>
elements through project specific CSS. To do so, create a CSS file (next to the JavaScript file that contains the
widget code) and fill it with the following CSS rules:
.tag-my-table-widget input {
    padding: 0;
    margin: 0;
    border-style: none;
}
which will render the table as it was rendered in the previous tutorial but with extra <input> elements.
Handling the new input in the table
It is now possible to edit the value in a cell of the table. However, the change is not yet send to the AIMMS model.
To make this happen, we will extend the <input> elements with a change handler. To do so,
we extend the function updateTableCell as follows:
function updateTableCell(type, row, col, text) {
    var cellElQ = widget.tableElQ.find('.'+type+'.row'+row+'.col'+col);
    if ( type == "values" ) {
        cellElQ.attr('value',text);
        cellElQ.on('change',function(event){
            // TODO send data change to model
        });
    } else {
        cellElQ.text(text);
    }
}
As documented in the jQuery API, the jQuery *change*
handler is called with an *event object*
as its argument that contains a reference to the target element that initiated the event.
In our case, the <input> element. The new value that is specified by the user is accessible
through the <code>event.target.value</code> object. Because the <input> element has been initialized
with type attribute set to text, all input values are retrieved as strings. The
requestSetValues method however expects a number whenever the underlying AIMMS identifier is numerical.
We will use the JavaScript function parseFloat to check whether the input is a number or not. Whenever
the parseFloat return the JavaScript value NaN (i.e. not-a-number), we will pass the new value as
a string. To check for the JavaScript NaN value, we use the isNaN function from the
lodash library, which is bundled with the WebUI.
The data change handler in this tutorial is implemented as follows:
function(event){
    var newValue = parseFloat(event.target.value);
    if ( _.isNaN(newValue) ) {
        // newValue is not-a-number, it will be passed as a string
        newValue = event.target.value;
    }
    dataSource.values.requestSetValues([{
        ranges: [{start:row,end:row+1},{start:col,end:col+1}],
        layerName : "values",
        value: newValue
    }],function onDone(status) {
        // TODO handle error
    });
});
Error handling
The onDone method has a status object as its argument. Any status code other than
the number 200 indicates an error. In case of an error, the status description contains a description
of the error. The following onDone handler will, in case of an error, show a dialog box with the error code
and description. In addition, the value attribute of the cell will be restored to its original value
(which is still in scope) and the jQuery blur method will be called to remove the focus from the
cell element.
function onDone(status) {
    if ( status.code !== 200 ) {
        alert('Error '+status.code+': '+status.description);
        // revert value
        cellElQ.attr('value',text);
        cellElQ.blur();
    }
});
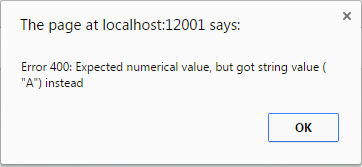
Having added the above onDone handler, the widget will come up with an pop-up whenever you try to enter
the string “A” as a new value (figure 2).
Disclaimer
When working with model data, not all data may be editable in the first place. Please note that the table we built in this tutorial does not take this into account. AWF is able to provide whether a certain cell is readOnly. Based on this information, you should adjust your widget to prevent readOnly cells from being editable. This however falls outside the scope of this tutorial.
When writing a widget that should be able to deal with large amounts of data, creating an <input>
with a handler for every cell in the table might not be the best way to go. Instead you might consider to have
one global table handler that is able to deal with generic cell changes instead.
The data change handler that is used in this widget sends a number to AIMMS whenever the input can be parsed as a number. You might get into troubles when you want to send a string that contains just numbers to AIMMS (for example the string “4321”). To cover for this case you need to build in more intelligence into your widget code.
Recap
The main topics that were discussed in this tutorial were
how to extend your widget with input fields.
how to communicate input changes in the widget to your model.