Day-to-day CDM operations
While the previous chapter focused on adding support for CDM in your model, and adapting your model to using CDM, we will now focus on all aspects of the day-to-day use of a CDM-enabled application by the end-users of your model.
Most CDM functionality is implemented in a white-box implementation in the section Branch and Revision Overview Support of the AimmsCDM library, with some low-level functionality like determining and dealing with individual differences of identifiers at the tuple level, as well as all interaction with CDM service implemented through external functions in the CDM DLL. This approach allows you to inspect most of the inner workings of CDM, and, together with inspecting the log files produced by CDM, will help analyze any problems there may with your CDM setup.
General concepts
Before diving in deeper into day-to-day operations you will need to learn some more general version control concepts used by CDM.
Branches and revisions
All data in a CDM data repository is organized in one or more branches. When a new CDM application database is created, it will start with two standard branches, the system branch and the master branch.
The system branch is not used to record any data changes, but solely to record administrative events as discussed here.
The master branch is the initial branch used to store data changes to the data of identifiers in any CDM category of the application at hand. Any commit to a branch will lead to the creation of a new revision on that branch, based on a parent revision. The parent revision represents the state of the application data just prior to the changes being made to the application’s data, that were committed to constitute the new revision. The CDM library will always maintain the state of the application data corresponding to a given revision in the CDM data repository, and thus is able to determine the individual changes of all identifiers in a particular CDM category compared to the state of that revision, and commit the collective of all individual changes to the CDM data repository as a new revision, with the given revision as its parent.
When checking out the data for a CDM category from a given branch in the CDM data repository, the CDM service will collect the latest values for all changes committed to all revisions on that branch for all stored tuples of every identifier in the category, and pass the collective of these latest stored values on to the client requesting the checkout, allowing the client to restore the exact application state at the latest revision on the given branch.
The initial revision on the master branch represents the empty state, i.e. the state where no application data whatsoever has been stored yet. New branches can be created based on any revision in the data repository. The initial state of any branch equals the state of the revision on which it is based.
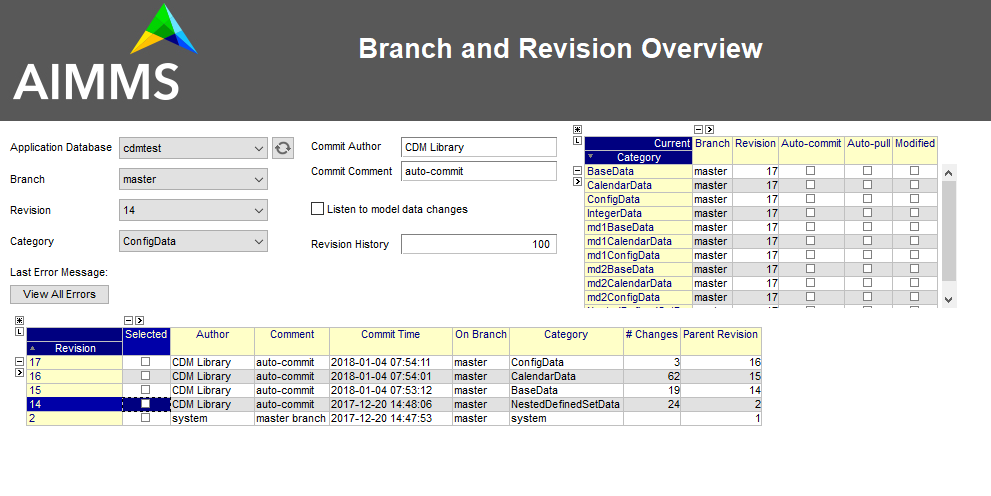
All branches created in the CDM data repository, as well as the revisions on all branches, can be inspected visually on the Branch and Revision Overview page of the CDM library, as shown below. From this page, one can also execute the most common version control operations via the context menus of the Category and Revision lists.
High-level versus low-level API
For day-to-day use the CDM library provides two APIs.
High-level API
The high-level API is used through right-mouse menus from within the Branch and Revision Overview page in the CDM library to perform the most common version control actions on the data in your model.
This high-level API is data driven, i.e. it operates on application databases, categories, branches and revisions set through the element parameters
cdm::SelectedDBcdm::SelectedCategorycdm::SelectedBranchcdm::SelectedRevision
The functions in the high-level API use the low-level API to combine various version control actions to implement their requested actions. If the high-level behavior is what you are looking for, you can use this API within your own code as well, by setting the above element parameters as appropriate and calling the high-level functions.
Low-level API
The low-level API is implemented in the DLL that comes with the CDM library. This API connects with the CDM service and exposes the full capabilities of the CDM library, and allows you to implement custom actions that are not implemented by the high-level API. The methods exposed by the high-level API can serve as an example from where you can implement your customizations.
Error handling
Whichever API you use, make sure to check the return values of the CDM methods you call. Typically, if there is some problem with your CDM setup, e.g. because of incorrect dependencies, checking out the data is likely to fail. Not only will this confuse your end-users, if they don’t get notified of the problem, but, also, such errors may not set the state of the CDM library correctly, causing subsequent commits to fail as well.
Low-level API error handling
The low-level API functions, will all return 1 if successful, or 0 otherwise. If you use the low-level API functions, you have to carefully check the return codes, and take appropriate action when a call fails. When a low-level API functions fails, it will call the procedure cdm::SetError, which registers all occurring errors and their stack locations in the cdm::ErrorMessage and cdm::StackProcedure parameters, which can be checked programmatically, or viewed from the List of Errors page in the CDM library.
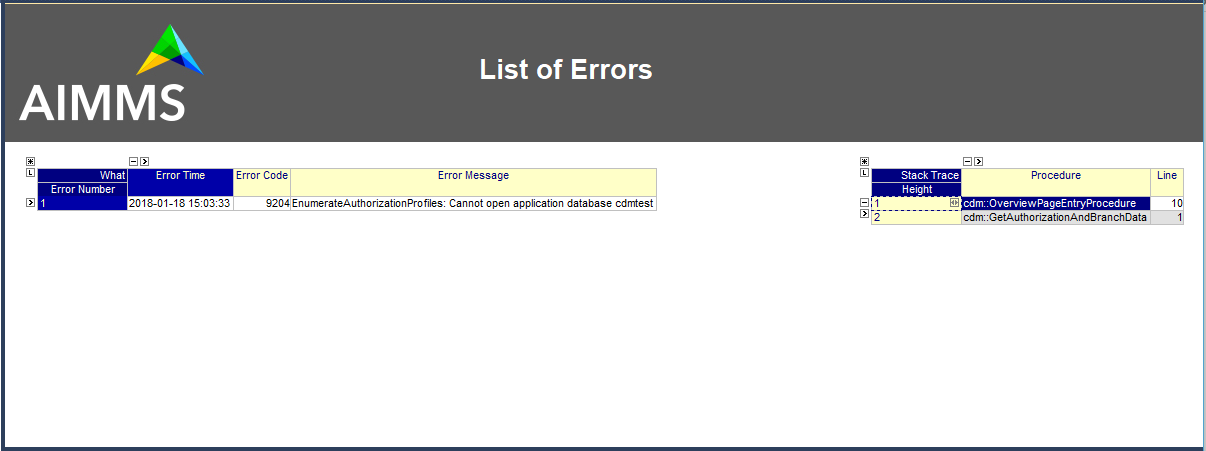
When checking the return code, you can also use these messages to report the error back to the end-user.
On-error hooks
In addition, cdm::SetError will call the procedure pointed to by the element parameter cdm::OnErrorProcedureHook. By default it calls the empty procedure cdm::EmptyErrorProcedureHook, which you can replace by your own implementation. You can use such a hook to report errors back to the user, or, for instance, to automatically raise an error, that you can catch in an onerror block in your own procedures that call low- or high-level API, if you happen to like an exception-based error handling approach.
If you do not provide an on-error hook yourself, you should still check the return values returned by the low- or high-level API methods.
High-level API error handling
The high-level API will check the low-level API error codes, and return on failure. If you have set a cdm::OnErrorProcedureHook that raises an error when called, you can catch the errors that occur both during low- and high-level API methods from within an on-error block in your code or through the global AIMMS error handler. In all other cases, you should carefully check the return values of the high-level API methods.
Basic actions
This section discusses the basic actions you need to know to get started using CDM: how to retrieve the current data from a branch and how to commit changes.
Checking out data
By checking out data you are replacing the current contents of the CDM-controlled identifiers in your model by a data snapshot represented by a particular revision in a given branch. By checking out a snapshot, all local changes to the data of the identifiers of the category you are checking out will get lost. There are several flavors of checking out data:
The high-level API function
cdm::CheckoutCategoriesSelectedBranchwill checkout all categories to the latest revision of the branch pointed to bycdm::SelectedBranchThe high-level API function
cdm::CheckoutCategoriesSelectedRevisionwill checkout all categories to the revision pointed to bycdm::SelectedRevisiononcdm::SelectedBranchThe high-level API function
cdm::CheckoutSelectedCategorywill only checkout the category pointed to bycdm::SelectedCategoryto the latest revision ofcdm::SelectedBranch.The low-level API function
cdm::CheckoutSnapshotwill checkout the specified category, branch and revision. Through the optional argumentslabelsOnlyandskipInactiveyou can indicate whether you only want to retrieve the label translation for all relevant element spaces, or that you also want to retrieve inactive data.
For long-lived repositories with a long history, you may want to consider using the retire and snapshot functionality provided by CDM to speed-up the checkout times. You can either completely retire old data on branches in your database, or store checkout snapshots in the database, which will be automatically updated to always allow users to quickly retrieve a recent snapshot updated with a pull request for the remaining commits on the specified branch of the given category.
Committing data
When some data in your app has changed compared to the state of the latest stored revision on the current branch, you can commit the local changes to the CDM database.
The high-level procedure cdm::CommitSelectedCategory performs the commit on the current branch of the category pointed to by cdm::SelectedCategory, and subsequently updates all other categories on the same branch to the committed revision. This will make sure that further commits to such categories will not fail because of being out-of-date compared to the latest branch of the selected category you just committed to.
The low-level method to commit data is cdm::CommitChanges which will only commit the changes for the selected category provided to through the provided procedure argument.
Being up-to-date
Committing data will fail when when the data in your client session is not at the latest revision of the branch in the CDM database that you want to commit to. In such a case, you must first pull all changes from the CDM database to get your client to the latest revision on the current branch, and resolve any conflicts that may arise between the remote changes that you pulled in and the local changes that you actually want to commit. After you successfully pulled in the changes and resolved any conflicts, you may re-commit your local changes.
Specifying a commit comment
With version control, it is a common practice to specify a commit comment in which you can describe, to some extent, which changes you made why in this commit. Along with the commit author and date , both of which are already added by the CDM library, this will allow you to inspect the list of changes made by multiple users of your application later on, and where necessary revert or re-apply change sets from the list.
The default way to specify a commit comment is through the string parameter cdm::CommitComment, or at a lower-level by specifying a custom commitInfoProcedure callback function to the low-level API function cdm::CommitChanges
Pulling changes
You will get notified whenever other users of your application have committed changes to the data you have checked out in your AIMMS session, at which point you can decide whether or not you want to pull in these changes. When you do not automatically pull in such changes, it is good to realize that, when you want to commit local changes of a category to the CDM database, you are only allowed to do this when you are at the latest revision of the branch that you have currently checked out of that category.
When you have made local changes to the identifier data of a category, pulling in the changes of new revisions from the CDM database, may lead to merge conflicts which you need to resolve. These merge conflicts arise from differing changes being made to the same tuple(s) of the same identifier in the change set being pulled in, and the local changes being made by the user on top of the latest revision being checked out in this session. Without further intervention, the CDM library will let remote, already committed changes, prevail over local changes. Conflict resolution is discussed in more detail here.
To pull changes the following functions are available:
the high-level API function
cdm::PullCategoriesSelectedBranchpulls in changes for all categories that are on the branch pointed to bycdm::SelectedBranch, to bring them to the latest revision of that branch.the high-level API function
cdm::PullSelectedCategorypulls in changes for the category pointed to bycdm::SelectedCategory.the low-level API function
cdm::PullChangespulls in changes for the given category, to bring them to the latest revision of the current branch of that category. The output argumentresolvedindicates whether there are any unresolved conflicts after pulling in changes.
Corrective actions
This section discusses how you can undo changes, or selectively (re-)apply changes in commits made by yourself or others.
Rolling back changes
As long as you do not have yet committed the local changes you have made to the identifier data of a CDM category, you can undo such changes by rolling back all identifier data to the state of the revision of the branch that you have currently checked out. As AIMMS will have this state stored in shadow identifiers in the CDMRuntime library, rolling back is just a local action, i.e., it does not require the CDM library to connect to the CDM service to perform the rollback.
To perform a rollback you can:
call the high-level API method
cdm::RollbackSelectedCategorywhich will roll back the category stored incdm::SelectedCategorycall the low-level API procedure
cdm::RollbackChangeswhich will roll back the category provided through its arguments.
Reverting changes
Even when you have committed local changes to the CDM database in one or more commits, you can still roll back changes, in this case accomplished by reverting the state of you local data back to the state of a previous revision as retrieved from the CDM database.
The high-level API function
cdm::RevertCategoriesSelectedRevisionwill revert the content of all categories to the state atcdm::SelectedRevisiononcdm::SelectedBranch.The low-level API function
cdm::RevertToSnapshotwill revert the content of only the category indicated to the branch and revision passed through its argument list.
After reverting the state of the local data to the indicated revision, it’s up to you to commit these changes to the CDM database if you so wish, either by explicitly committing the changes to your current branch, or, when *auto-commit* has been set for one or more categories, the CDM library will automatically commit the changes caused by reverting the selected branch.
After committing the newly created revision, the CDM database will, at the newly committed revision, actually contain the identical data as on the selected revision to which you reverted.
Cherry picking changes
You can selectively apply changes made by yourself or others into your own branch by cherry picking changes made in other commits. You should be aware that changes made in such a commit can be dependent on elements being added in other commits. In case the element is not known yet in the branch you are working on, cherry picking such a commit will fail unless you prior cherry picked the commit introducing the new elements.
Cherry picking can be a convenient tool when you have reverted your branch to the state of a previous revision, but do want to include some of the changes that have been committed afterwards.
To perform a cherry pick you can use:
the high-level API method
cdm::CherryPickSelectedRevisionswhich will cherry pick all revision in order set in the identifiercdm::RevisionsSelectedforcdm::SelectedDBandcdm::SelectedBranchfor the categorycdm::SelectedCategoryinto your current branch. You would typically use this method after selecting the revisions to cherry pick in theBranch and Revision Overviewpage of the CDM Library.the low-level API method
cdm::CherryPickChangesmethod will cherry pick a range of revisions from the indicated branch of the indicated category into the current branch of that category. The output argumentresolvedindicates whether conflicts with any local changes in the category data have been resolved successfully.
Working with branches
The CDM database can simultaneously hold various different versions of the state of your application’s data. These different states are called branches. Branches are created off a particular revision on a given branch in the CDM database, which then defines the initial state of the application data on the newly created branch. Any commits to such a new branch will then alter the initial state of the branch, but will leave the state of the branch from which the new branch was derived, unaltered.
Thus, branching will create a tree of revisions, where the state of each revision is either based upon the state of its parent revision on the same branch plus the local changes committed in that revision, or upon the state of the revision of a given branch at which a new branch has been created.
Reasons to create branches
Independent data sets
You can use branches to create completely independent data sets. This is particular true of you branch off revision 2 of the master branch, which represents the empty data set in any CDM database. However, you can also create independent data sets by branching off a revision that already holds data that is common to all the independent data sets you want to create. You can switch between the various data sets created in this manner, by checking out the corresponding branches.
Creating multiple scenarios
When you already have a data set from which you want to create multiple scenarios, you can do so by creating new branches at the revision in the CDM database representing that data set, one for each scenario you want to investigate. On each new branch created in this manner, you can commit the changes that make up the scenarios you want to investigate. By checking out the branch that represents a particular scenario, you can work with that scenario in your local session. You can then further adapt the data for that scenario, or perform an optimization run.
Eventually, if you have decided that you want to continue working with a single scenario, you can merge the corresponding branch back into the branch representing the original data set from which all scenarios were created. This will add all the individual data changes you made as part of the scenario to the original data set.
Creating branches
To create a branch you can
call the high-level API function
cdm::CreateBranchSelectedRevisionwhich willpresent a dialog to provide the name of the name branch and a comment about the reason for the new branch
call the low-level API function
cdm::CreateBranchto create the branch off the revision pointed at bycdm::SelectedRevisiononcdm::SelectedBranch
call the low-level API function
cdm::CreateBranchto create the branch as specified through its arguments.
Switching to the newly created branch
Notice, that creating a branch will not check out your local session to the newly created branch. If you branched off the revision currently checked out in your local session, you can simply change the revision to the initial revision of the newly created branch using the low-level API function cdm::SetRevision (as both revision actually hold the same data). To obtain the head revision of the newly created branch you can call function cdm::EnumerateBranches, after which you can obtain the head revision from the identifier cdm::BranchHead.
If the data in newly created branch differs from the data in your local session, you should perform a full check out to the newly created branch. If you do not check out the newly created branch, but instead try to only set the revision to the head revision of the newly created branch, you will leave the internal data state of your client session in an inconsistent state, which will lead to possibly incorrect commits being performed when you want to commit local changes on the new branch.
Deleting branches
AIMMS CDM also allows you to delete branches from your repository. This is an inherently dangerous operation, as deleting a branch will not only delete the branch itself, but also all branches that are derived from the branch that you delete, and all data on these branches. You cannot delete the protected branches system and master.
To delete a branch you can
call the high-level API function
cdm::DeleteSelectedBranchwhich willcall the low-level API function
cdm::DeleteBranchto delete the branch pointed at bycdm::SelectedBranchupdate the set
cdm::Branchesandcdm::Revisionsto remove the all branches and revisions deleted from the CDM database.
call the low-level API function
cdm::DeleteBranchto delete the branch as specified through its arguments.
Comparing multiple branches
In the branch comparison identifiers AIMMS CDM allows you to compare multiple scenarios, the data of which is stored in multiple branches in the CDM database. You can directly display the contents of these branch comparison identifiers in either the Windows of Web UI.
To add and remove the identifier data of a particular branch you can
call the low-level API function
cdm::AddBranchToCompareSnapshotsto add branch datacall the low-level API function
cdm::RemoveBranchFromCompareSnapshotsto remove branch data
Please note that these functions will add elements to the domain sets in the actual model, i.e., corresponding to the content of the current branch, if the data of held in the branches being added to the branch comparison identifiers are not present in the current branch. Without adding such elements, the branch data cannot be added to the branch comparison identifiers. Therefore, if you want to use the branch comparison functionality, you are advised to temporarily disable auto-commit functionality if applicable, and revert the data of the current branch when you are done comparing scenarios before committing to the current branch.
Merging branches and resolving conflicts
After you have committed one or multiple changes to a particular branch, you may want to merge such a branch with another branch. For instance, you may want to merge the changes you made to data for a particular scenario you examined, back into the branch on which the scenario was based, because that particular scenario represents the desired action you want to implement for the main branch.
Reducing database execution and data transmission
Retiring intermediate branch data
After you have been working with a given branch for a longer time, most probably only the most recent commits make sense to retain, as individual data changes in the past may have become obsolete, and may lead to longer checkout times, as the current branch data must be reconstructed from a larger amount of commits. Through the function cdm::RetireBranchData, you can replace the cumulative changes for all categories from the root of a particular branch up and until a given revision by a single snapshot containing the same change set.
You can retire commits of all branches except the system branch. The function operates on the branch proper up and until the specified endRevision, it leaves data on parent branches alone. On the branch proper it will delete all direct child branches and derived branches thereof, and will collect the latest changes over all tuples and will combine those changes at the last revision on the given branch lower than endRevision. If there is no such revision, than no data will be combined into such a revision. If there is no data on parent branches, you may set the optional argument removeDefaults to 1, which will remove all default values from the newly combined commit. Finally, all intermediate commits on the branch proper and on dependent branches will be deleted and the per-identifier cardinalities will be adapted.
Cleaning up databases by removing element references
Another approach for reducing the size of a CDM database and the time it takes to checkout data, you can instruct CDM to remove all references to a set of elements from all data tables in a CDM database, by removing all rows where these elements occur in the tuples or values (of element parameters). After you have collected changes for such elements for a period of time, the data for such elements may have become obsolete. Although you can remove the elements from it corresponding root set, they will remain stored in the CDM database, and thus unnecessarily increase the size database and the checkout times of categories.
If you are certain that you will never need these elements and their corresponding data, you can call the function cdm::RemoveElementsFromDatabase to let CDM remove all references to such elements from all data tables. Please make sure that during this action no other clients are connected to the CDM service, or that all clients checkout the data of all categories again, to finally remove the data for these elements from their sessions.
Cached Checkout snapshots
Besides completely retiring all old commits on a given branch, CDM also allows you to create cached checkout snapshots for a given revision of a specified category-branch combination. Cached checkout snapshots are ready-to-send packages stored in the database in a compressed manner, that can serve a client virtually no database access other than retrieving the cached snapshot.
Note
As of version 24.6.1.1, CDM will automatically create snapshots on checkout for every branch for which no snapshot exists. These snapshots will be updated once a day. In addition, CDM will store the deltas for every commit, which allows a checkout to rely solely on returning a snapshot and a collection of deltas in most cases, thus drastically reducing the need for executing the need to execute expensive SQL queries to create a checkout.
You can explicitly create checkout snapshot by calling the function cdm::CreateSnapshot, which will create the snapshot server-side in the background. The cacheUpdate arguments indicates the interval in seconds with which you want the checkout snapshot to be automatically updated by the CDM service to contain the latest data for the given category-branch combination. When checking out, the CDM server will first check whether there is a checkout available for the given category on the specified branch. If so, it will return the snapshot, combined with the result of a pull requests for the changes of the revisions not yet cached. Typically this will drastically reduce the time involved when checking out data on branches with a long history. When searching for a snapshot, the CDM service will consider any snapshot on the path from the head of the specified branch to the root of the revision tree.
If you specify the value of 0 for the cacheUpdate argument, the CDM service will cache a snapshot, but will never update it. You can use such cached snapshots, for instance, to speed up the retrieval of data on branches that branch off the given branch posterior to the cached revision. If you store multiple snapshots with a positive cacheUpdate value on a given category-branch combination, the CDM service will remove all but the youngest cache entry. Through the functions cdm::GetSnapshotCache and cdm::DeleteSnapshot you can retrieve a list of all snapshots currently in the cache, and manually delete snapshot that are no longer of interest to you.
Note
For CDM backends backed by a MySQL database, you may need to increase the value of the MySQL option max_allowed_packet for categories containing a lot of data. If packet size is not big enough to contain the entire snapshot, the connection to the database will be lost when the CDM service tries to store the snapshot.
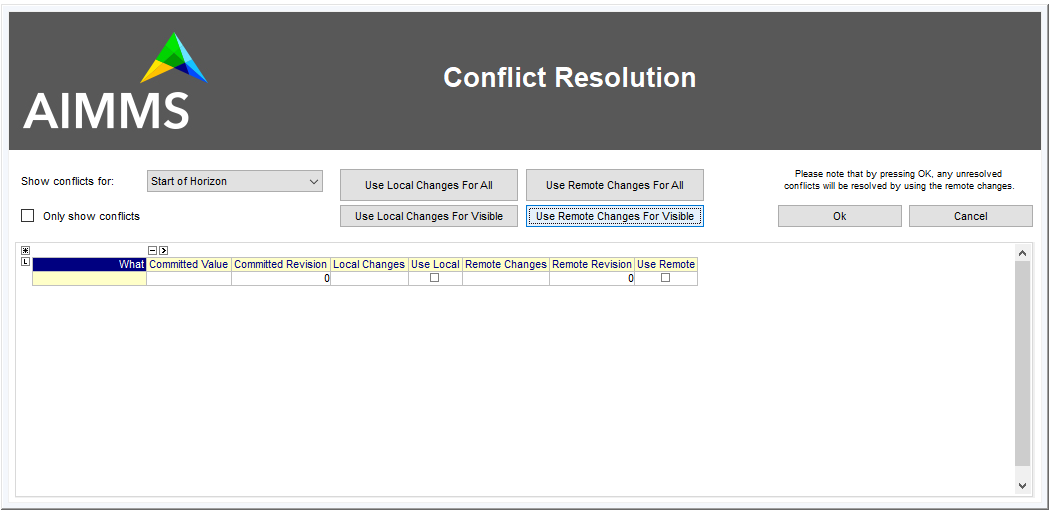
Interactive merge
You can interactively merge two branches from within the Branch and Revision Overview page, by selecting a revision on a branch, and selecting the Merge Selected into... action from the right-mouse menu. While in interactive mode, you will get the opportunity to provide a merge comment interactively, and to set the conflict resolution algorithm to choose. CDM will resolve conflicts according to one of the following options
AlwaysUsingRemote(default): always let remote changes prevail over local changes (i.e. changes from the merged branch will prevail over changes in the branch to merge into)AlwaysUsingLocal: always let local changes prevail over remote changesInteractive: let the end-user resolve all individual conflicts interactivelyWebUI: not implemented, for now the same asInteractiveCustom: use a custom procedure to resolve conflicts.
By default, the interactive conflict resolution mode consists of a very generic dialog using identifier names to present the individual conflicts. Before you can start using the interactive conflict resolution mode, you have to generate the identifier-specific pages used to present the conflicts to the end-user. You can make more clear to your end-user what the actual conflicts are about in their terms by providing values to the string parameter cdm::UserIdentifierText for all relevant identifiers. If you provide a descriptive string here, it will be used in the conflict resolution or differencing page, otherwise the identifier name will be used.
The generic conflict resolution dialog may be overwhelming for end-users. We therefore advise to select either the AlwaysUsingRemote or AlwaysUsingLocal modes to let CDM resolve conflicts automatically, unless you really see a need for your end-users to resolve conflicts visually. In the latter case, you should at least provide descriptive text for each possible identifier that makes clear to your end-users what part of the regular UI the conflicts are actually about.
Non-interactive merge
The interactive merge uses the the non-interactive merge facility in CDM which you can call through the procedure cdm::MergeBranches. It will merge the data for cdm::SelectedCategory for the revision pointed by the cdm::SelectedRevision on cdm::SelectedBranch into the current branch for cdm::SelectedCategory.
In the non-interactive merge mode, you can
set the actual merge comment through the string parameter
cdm::MergeComment, andselect the conflict resolution methods to use when merging, through the element parameter
cdm::SelectedConflictResolutionMethod.
If all conflicts are resolved successfully, then the result of the merge will be committed as a new revision on the current branch for cdm::SelectedCategory, and cdm::MergeBranches will return 1. If the conflicts could not be resolved successfully, your repository may be in an undefined state as a result of the failed merge, and you are advised to checkout the category cdm::SelectedCategory to the head of its current branch again.
Visually viewing differences
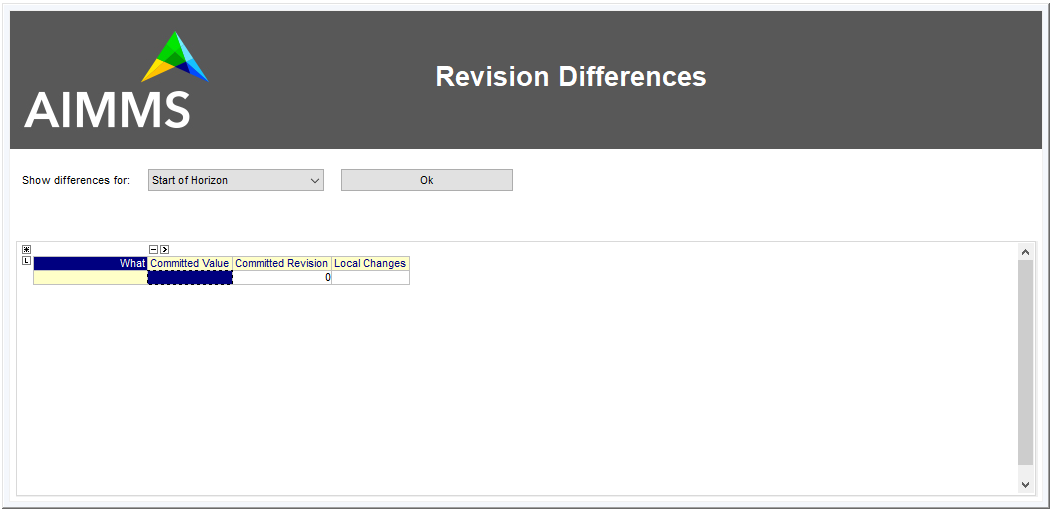
Generating the conflict resolution/differencing UI
For any project containing the CDM library, you can create a generic UI for visually resolving merge conflicts and viewing differences between revisions as follows.
Add a new, empty, library to your project called
AimmsCDMUIRun the procedure
cdm::CreatePageManagerFileto add a page manager file to this library listing a new page for all identifiers in all CDM categoriesRun the procedure
cdm::CreateIdentifierPagesto create the individual difference/conflict resolution pages for all identifiers in all CDM categories
Providing clearly understandable end-user text
By default, the pages thus created will be shown in the conflict resolution dialog or the data difference page by their identifier name, which may be confusing the end-users of your application. You can change the text displayed for each identifier by specifying the identifier text you want to display through the string parameter cdm::UserIdentifierText.
Adding to source control
If your project is stored in a source control repository itself, do not forget to add the pages just created to that repository.
Updating the generated UI
Please note that you should re-generate the pages for the conflict resolution dialog whenever you add new identifiers to your CDM categories, or when you make structural changes to existing identifiers in any CDM category. This will make sure that the conflict resolution dialog will remain showing the correct information.
Auto-committing and auto-pulling changes
By default, CDM leaves it up to you when to commit your changes, or when to pull changes committed by other users who work on the same branch. That’s usually a great approach for strategic or tactical applications, or when you work on scenarios that you don’t want to share yet.
When your application becomes more operational, however, your end-users will most likely want to see changes made by other users as soon as possible, as operational apps typically work with on a single data set, represented by a single branch in your CDM database.
Auto-pulling changes
Whenever a user commits a change set for a given CDM category to a particular branch in the CDM database, all other users connected to the same category will get a notification from the CDM service that a revision has been committed for the given category and branch. You can instruct CDM to automatically pull in such changes by setting the parameter cdm::AutoPull to 1 for the category at hand. CDM will then pull in any commits for that category which take place on your current branch. It will skip all commits on other branches.
By setting cdm::AutoPull you make sure that your client session is always up-to-date with the CDM database, and with all other clients who use this setting as well, regardless of the manner of how local changes are committed.
Auto-committing changes
You can also make the CDM library listen to your local data changes, and automatically commit changes to the CDM database. To accomplish this, you need to execute the following two steps:
Call the procedure
cdm::StartListeningToDataChangesto instruct the CDM library to react to data change notifications of the AIMMS engine. Whenever this procedure has been called, the CDM library will examine all identifiers in all categories upon a data change notification by the AIMMS engine, and register any change in any CDM category.If the parameter
cdm::AutoCommithas been set for a category, then the CDM library will automatically commit the changes to such a category as soon as they are detected.
By setting cdm::AutoCommit you increase the concurrency of your app even more. With these settings, you make sure that other client sessions will always be up-to-date with any changes you make as soon as they occur.
Customizing behavior
The behavior described above is actually implemented through the procedures cdm::DefaultCommitInfoNotification and cdm::DataChangeProcedure passed as the defaults of the (optional) arguments notificationProcedure and datachangeProcedure to the procedure cdm::CreateCategory. By specifying other procedures with the same prototypes you can further customize the behavior of your app with respect to incoming commit notifications and detected local data changes, if the need arises.
Obtaining identifier history
Through the function cdm::GetValuesLog you can obtain the history of a given parameter reference on the current branch, from a given revision. The history is stored in the shadow parameter corresponding to the given parameter reference in the ValueLogIdentifiers and ValueLogDomainIdentifiers modules of the CDMRuntime library.
As the full history may be very large, and retrieving it may be very time-consuming, the procedure accepts only a reference to a single parameter slice, and only for this slice the history will be retrieved. This allow use cases, where you are able to retrieve and display the history of a single field in the UI of an AIMMS app at very low cost, or to retrieve and cache the history of a larger slice at higher costs, and display a sub-slice directly from the shadow identifiers.
Implementing locking semantics
Although CDM itself offers merge-style version control facilities for AIMMS data, the facilities offered by CDM also allows one to easily implement locking-style version control at the application level.
A working approach to accomplish locking-style version control is to introduce additional parameters into your model with the sole intent to lock specific resources in your model, and add those parameters to a category for which auto-commit and auto-pull is activated. Now, when you want to lock specific resources within your application, you can do so by checking the resource for availability and lock it by setting the lock parameter to 1 for the resource at hand. When committing these changes, all other client apps will be automatically notified of the lock change, and henceforth the resource will be locked for all other clients until it is unlocked by the client possessing the lock.