AIMMS Cloud Database and VPN Configuration
Note
This article describes one of the many options for data integration with the AIMMS Cloud. A VPN might not be the best solution for your situation. Use our integration helper in the article Data Integration with AIMMS to see which option fits best.
This section describes how to manage and administer the application database and connectivity (through VPN or otherwise) to it.
General Idea
We can attach a MySQL database to any AIMMS Cloud account. This database can be used for storing data - whether this involves input data to be used in AIMMS applications or if it’s the results of optimizations.
The database is only accessible from within an AIMMS session. If you want to access this data from an external source as to push data to it or to retrieve data from it, there are two possibilities:
Database Tunnel Application
Recommended if you need occasional access to the database (e.g. to inspect some tables, alter the schema, add users, etc.). See Database Tunnel Application section in this document for more details.
VPN (Virtual Private Network) connection
Recommended if you need more permanent access, e.g. when you regularly synchronize between an on-premise resource and the application database. This specific setup is required based on our cloud architecture.
The picture below shows the conceptual network topology:
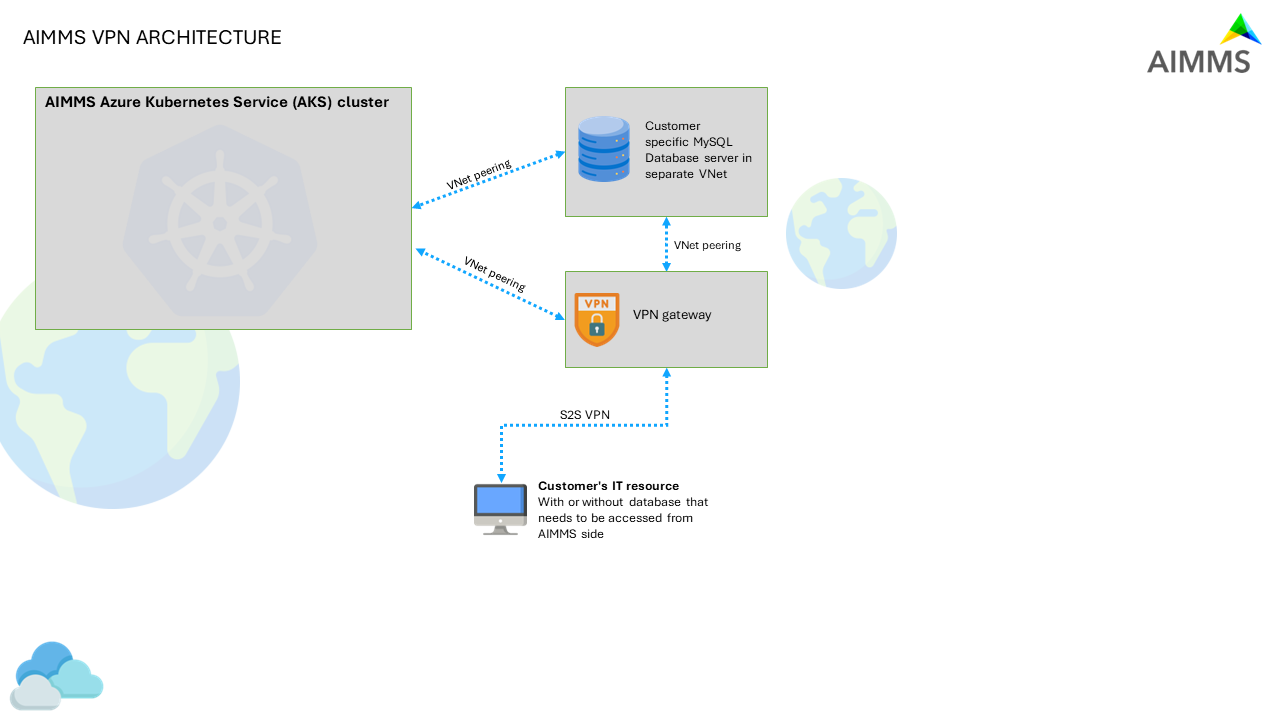
When a VPN connection has been set up, sessions cannot reach anything on premise, because the sessions are configured to only have a route available to their appropriate Customer Single Tenant Private /26 network.
Similarly, the Tunnel Service and the database tunnel application only allows access to the database of the appropriate customer. Access to that tunnel service is arranged via PRO user/group management.
Initial Database Setup
An AIMMS Cloud account does not have a MySQL database by default. If you want one, or would like to understand if your setup already has one, please contact support by sending an email to support@aimms.com.
Requesting a VPN Connection
Before setting up the VPN, be sure you have the following information available. Typically this requires the involvement of your IT department:
The Local Address Prefix
The IP address ranges that will be routed through the VPN gateway to the VPN device (e.g. 10.0.0.0/24)
The Local Gateway Public IP
This should be a valid public IP address of your on-premise device the VPN will need to connect to - as such it must be reachable by Azure.
Loadbalancer yes/no
A loadbalancer is a requirement if you want to have two-way traffic. By default you will only be able to push data to the MySQL database; with a loadbalancer you will create the opportunity to also be able to access an external (on-premise) database from within the AIMMS Cloud.
Requesting the VPN connection can be done by sending an email to support@aimms.com with the above information. The default settings are presented below:
Encryption algorithm |
aes-cbc-256 |
Integrity algorithm |
|
PFS Group |
none |
SA lifetime (seconds) |
3600 |
IKE version |
IKEv2 |
Encryption algorithm |
aes-cbc-256 |
Integrity algorithm |
sha1 |
Diffie-Hellman group |
2 |
SA lifetime (seconds) |
600 |
UsePolicyBasedTS |
But it is possible to deviate from these settings with any of the options presented below:
Encryption |
Encryption Integrity/PRF |
DH Group |
|---|---|---|
AES128 |
SHA1 |
DHGroup1 |
AES192 |
SHA256 |
DHGroup14 |
AES256 |
SHA384 |
DHGroup2 |
GCMAES128 |
MD5 |
DHGroup2048 |
GCMAES256 |
DHGroup24 |
|
ECP256 |
||
ECP384 |
||
None |
IPsec Encryption |
IPsec Integrity |
PFS Group |
|---|---|---|
None |
GCMAES128 |
ECP256 |
AES128 |
GCMAES192 |
PFS2048 |
AES192 |
GCMAES256 |
ECP384 |
AES256 |
MD5 |
None |
DES |
SHA1 |
PFS24 |
DES3 |
SHA256 |
PFS2 |
GCMAES128 |
PFS1 |
|
GCMAES192 |
||
GCMAES256 |
Other settings are:
IPsec SA lifetime in KiloBytes (default = 102400000)
IPsec SA lifetime in seconds (default = 27000)
DPD timeout in seconds (default = 45)
See also
To help you diagnose and resolve common issues while connecting to our Azure Virtual Network Gateway via Site-to-Site VPN, please see VPN Troubleshooting Guide.
Database Tunnel Application
We have a simple AIMMS Desktop Application available for Windows (‘DB Tunnel App’) which allows you to open up/close a local connection to the AIMMS Cloud App database. All you need to do is publish this application with AIMMS Version 4.66.2 or higher on your PRO Portal and configure the Tunnel from the Configuration menu. See also Tunneling Support for more details on Tunnels.
For example, if your app database is called example.db.aimms.cloud then your Tunnel configuration and DB Tunnel App would be as shown:

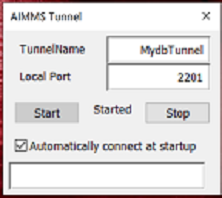
Where ‘TunnelName’ is URI Context Path and ‘Local Port’ can be any port between 1 to 65536.
You can Start/Stop Tunnel using Start and Stop buttons. Once you have provided ‘TunnelName’ and ‘Local Port’, you do not need to click Start or Stop each time. You can check ‘Automatically connect at startup’ parameter, after which the tunnel will be started automatically upon launching the application.
When you close the application, the tunnel will also be closed. You can download the DB Tunnel App from here.
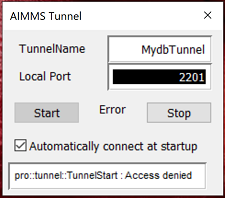
We have further enhanced the DB Tunnel App such that it can report errors when it can not start the tunnel. Example scenarios/error messages are:
When the local port is already in use on the same machine by any other application. –
pro::tunnel::TunnelStart : while binding to tcp://localhost:3306When the AIMMS PRO User does not have access to the Tunnel. –
pro::tunnel::TunnelStart : Access deniedWhen the TunnelName is not found. –
pro::tunnel::TunnelStart : Tunnel not found
Connecting to Cloud DB using MySQL Workbench
Once the tunnel is started, you can connect to the AIMMS Cloud App database locally via MySQL database administrative tool i.e. MySQL Workbench. Your connection parameters should be as shown:
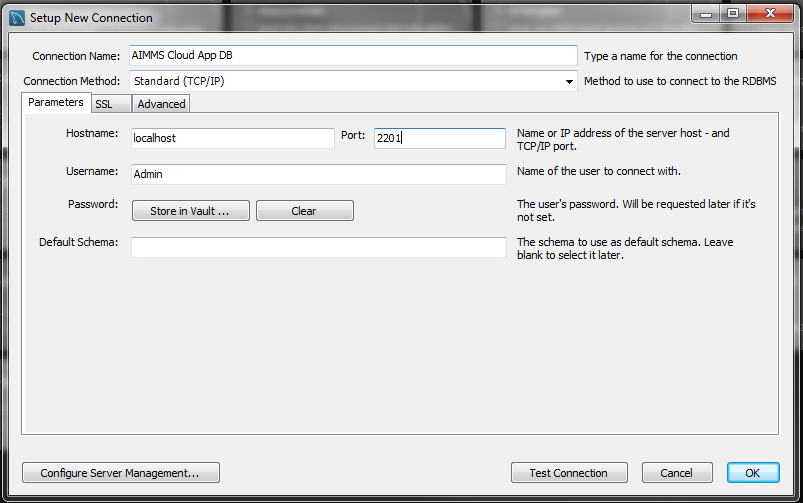
Note
Please make sure that ‘Hostname’ is localhost and ‘Port’ is same as Local Port specified in Tunnel App (i.e. in this example it is 2201).
To use tunnels in your AIMMS model, please check model changes for tunneling.